Showing posts with label Programming. Show all posts

Thursday, September 12, 2013

An attempt at Arduino

I've always wanted to fool around with electronics. Particularly, I've been wanting to fool around with microcontrollers since it seems awesome to program things that don't live entirely within a RAM chip, but directly interact with "the outside world". The problem is, I never know where to start.  I actually programmed some basic ATMEGA stuff when I was a student, but it was under a rushed research environment and I had time enough only to get things thrown together, put it in a box, and move on without thinking too much about it.

I kept hearing about this thing called Arduino. which seems to be a good place to start. Utilizing an upcoming birthday, I hinted heavily to my wife that the perfect gift for a geek like me was a "get your feet in the water" Arduino kit. My pressing hints payed off and I've just started fooling around with my new Arduino Uno.


Upon first glance, Arduino seems pretty awesome. It is a composite microcontroller/programming board which gives you easy access to a number of digital/analog i/o pins. Despite the convenience of this, I was initially put off by this. During my brief stint with AVR programming, I could remove my little ATMEGA chip, and stick it in a small box containing a 9V battery and a tiny breadboard and have my device. If I wanted to make a couple, I just needed the ICs, and not several copies of the programmer, which scales up the size and cost of a duplicate project.

I have this dream of placing a bunch of ICs on a breadboard for individual projects, rather than chunking together a bunch of Arduinos. However, discussions such as this one have convinced me that under the hood, an arduino is simply a special  a AVR programmer, and if I wanted to, I could use the arduino board to program AVR chips just the same. So for now, I'm sold, and am excited to get started.

Apparently, the equivalent of "hello world" in the microcontroller world is to blink an LED, so that was my first step. I found a quick tutorial on this and, as is my habit, tried to modify it a little from the get go. As a first selling point to Arduino, it was about three minutes from opening the box to getting a simple program running.

The first step was to download the Arduino software which allows you to either debug, or upload your program with the click of a button. The next step was to wire up a simple circuit board to do my bidding. The idea for this first program is simple: When the user clicks a button, slowly ramp up the voltage to an LED from whatever it was to a maximum value. When the button is pressed again, it slowly ramps down to 0.

The code for this is simple: A button press toggles the state of the device between on and off. When its on(off) the device increments(decrements) the brightness (which is just a PWM voltage) and delays for 10 ms. That's pretty much it. There is a bit of weirdness of the switch bouncing which can be remedied by introducing a slight delay after switching states:

const int aLED = 9;        // Analog LED
const int BUTTON = 7;      // Push Button
boolean buttVal = 0;       // True if button pressed
boolean buttValOld = 0;    // Value from last cycle

boolean on = false;        // Stores the state' of the device

int brightness = 0; // Stores the brightness value from 0 to 255

void setup()
{
  pinMode(aLED, OUTPUT); // Set pin9 for output
  pinMode(BUTTON,INPUT); // Set pin 7 for input
}

void loop()
{
// Handle a button press. If the state has changed, delay for 5ms 
// to avoid bouncing
  buttVal = digitalRead(BUTTON);
  if(buttVal&&!buttValOld)
  {
    on = !on;
    delay(5);
  }
  buttValOld = buttVal;
  
  if(on)  // If state is on, ramp up voltage each cycle, then delay
  {
    if(brightness<255)
    {
      brightness++;
      delay(5);
    }
  }
  else  // If state is off, ramp down voltage each cycle, then delay
  {
    if(brightness>0)
    {
      brightness--;
      delay(5);
    }
  }
// Finally, set the LED voltage to the current value of 'brightness'
  analogWrite(aLED,brightness); 
}

The circuit itself is also is exceedingly simple: depressing the switch routes 5V to the input pin 7, which causes digitalRead(BUTTON) to return a "HIGH" state. The LED voltage is run through a 270 Ohm resistor to ground to limit the current drawn from output pin 9.


The result .... is pretty much what you'd expect:


I had a lot of fun with this one and am looking forward to the next mini project-ling.

Saturday, November 13, 2010

Side Scrolling Fun V: Music, Levels, Bosses, and Media Managers

The next iteration of the side-scroller engine is up and running, and is almost starting to resemble an actual game. The first thing I did was find out why the game took so long to load. The answer was simple - I was being stupid: each instance of image and sound in the game was being loaded each time it was needed. In other words, I had roughly 3000 tiles consisting of one of 3 distinct images. When the level was loaded I loaded each image separately from the server, i.e. I downloaded ~3000 image per level, while in fact I needed to download three. To get around this, I wrote a ImageManager (iMan) class. Each time an Image is needed you ask the iMan for it and give it only the filename. The iMan checks its database to see if that file has been loaded yet. If it has, it returns a copy of the image, only if it has never loaded that image does it request it from the server. This lead to a tremendous speed-up in loading time and seems to work fine.

The next fish to fry was sound - both sound effects and soundtracks. I started by making a sound manager (sMan) similar to the image manager. Next I had some struggle with sound formats. Java doesn't care much for wav files. I basically had to tinker with the bit-rate, depth, etc. to get it to play, and I still don't know why some play and some don't. All I can say is that the java native sound engine is good, but finicky. As for sound track, I went for straight up midi which was a lot easier to work with. Currently, all the songs are ripped off from an awesome repository of nes roms that I came accross and I am starting to try to "compose the original score" :)

The next task was to create game states that allowed specific tasks to occur (ex. loading, player just died, player is playing, etc.) This allowed for an intro screen when the game was loading and cut-scenes between levels. This also allowed for animations and sound clips to run when the player dies or beats a level. The paint and run methods are then if-else statements based on the current state. The states are:
  1. Intro
  2. LoadIntro
  3. LoadLevel
  4. Playing
  5. JustDied
  6. Boss
  7. JustPassed
The next improvement was the addition of levelguys, i.e. bosses. In boss mode a life-meter pops up displaying the boss' health as the gameState is set to "Boss". The screen also locks and the music changes. After the boss' energy reaches -1, the gamestate goes to justpassed and some celebratory music (currently from Duper Mario Bros.) plays. In order to mediate the timing of the cut-scenes, there is a variable tickCounter which is set when the game enters a given mode. When in this mode, each tick of the game loop reduces the tick-counter by one so that when it reaches zero, a new game state may be entered.

The boss can be seen here. He's (it's a dude) pretty easy and used for debugging purposes.


Here's screen shot of the the game in action: Click it to play!


The source code for this version can be found here. The "game" can be "played" here.

Friday, October 1, 2010

Side Scrolling Fun IV: Enemies, Mortality and Backgrounds

For the next small step in the side-scroller engine, I wanted to tidy the look up just a bit, add drone-type enemies, and have it so the player could die. For tidying it up, I first added a parallax background which consists of a layer of sprites and a depth into the screen. The larger the depth, the slower it scrolls, so a depth of 1 would scroll faster (twice as fast) than a layer with a depth of 2m and a depth of infinity would be stationary. This was a cheap attempt at a pseudo 3-D (circa 1982) feel. The background itself could be made in a level editor, or loaded as a random array of background elements upon start-up. For now the only objects are clouds placed at random, at two separate depths.

Another "look and feel" kind of effect was to have a clear-cut beginning and end to the level. You notice in the old Super Mario Bros. series (and most side-scrollers) the screen follows Mario unless he's at the beginning or end (or top or bottom) of the level at which the screen stops moving and Mario move with respect to the screen. To accomplish this, I just checked if the current screen would be more left than the leftmost tile or more right than the rightmost tile. If so, then the screen was fixed at the extreme point, i.e.

double screenX = 0;

if(xCX)

{

screenX = CX;

}

else if(x>levelMaxX-CX)

{

screenX = levelMaxX-CX;

}

else screenX = x;


... and similarly for y. Also, to make things more efficient I only computed collisions, drew tiles, and processed enemy behavior if they were visible. Since each of these elements are sub-classes of and abstract "Square Object" class, or Squob, this is really simple. At each iteration get all squobs within a half screen width distance from the player and update and draw those objects alone. Right now the speed-up in unnoticeable but for larger levels with more advanced processing, this could become significant.

Next step was getting enemies on the screen. This was done by making a generic Enemy class which extends Squob. No opponent in the game is directly from this class, but each individual enemy extends these properties. Then I just created an array of enemies and updated the array on each game iteration. Each enemy has a sprite manager which handles its animation and a function called iterate() which defines its behavior. Right now, the "behavior" is just to walk in a straight line and turn around if its next step will bring it over a ledge or if it bumps into another enemy or a wall. Whether or not a collision occurs is passed to the enemy from the main program.

The two prototype monsters are the "grunt":

and the "peon":
which basically do the same thing now: walk back and forth, and hope to bump into "smiley":
... who is not currently smiling.

In order to conveniently add the array of enemy monsters to the game in just the right place. I modified the level editor to allow for monster placement, as well as player start point. The level file now contains player start coords, enemy positions, and tiles:


clicking on the picture will give you the zipped source code.

To make it so the player could die, I just check for special cases in the collision detection. For example if the player collides with a spike, he dies. If the player collides with an enemy from below or the side, he dies, but if he collides from above, the enemy dies. Here the player dying means that his 'lives' get reduced by one, and he's warped to the beginning of the level. Now, nothing happens if he runs out of lives he just has a negative amount of lives. The philosophical implications are mind boggling!

Here is a screen-shot of the program in action. Click on the pic to try the game. One problem is that the loading time is brutal. At first I thought that it was the server but after writing a simple test program which loads a single image and text file from the server I noticed that this was not the case, as the test program ran instantly. Upon closer inspection I think it's just that I was being stupid. When the level is loaded it loads each tile as an image from a URL which is ridiculous. For next iteration of the program I'll just load each item once (via a LoadManager?) and store these images as global type files.


In the next programming run, the goal is to make a polished, 2 level game that doesn't make any sense. The game will have sounds, cut-scenes, intro, game-over screens, 1-up, nicer graphics, level bosses. In addition I'll try to debug all the little problems like slow loading times. This all needs to happen before the final stage of game design - that is; a story, characters, and lots of levels and variety.

Thursday, September 9, 2010

Side Scrolling Fun II: The Level Editor

In the very basic side-scroller engine that I started, I needed obstacles for the character (or circle) to walk on. This was done by manually typing in the coordinates and dimensions of the obstacles directly in the code. This is ridiculous and should be done with a level-editor type program, so I decided to take a stab at one. I decided to try to learn the nice-looking Java Swing layout editor. To simplify things such as file i/o, I made a stand-alone program instead of an Applet. At first, learning Swing was a huge mistake since I spent hours trying to make things work. After a while I learned the basics: the main window is a JFrame, which contains a number of JPanels which can be addressed individually. The frame can have a menu, a toolbar, and a drawing area, among other things.

The main program, which contains a menu, a toolbar and a drawing area (MapPanel which extends JPanel) is MainFrame (extends JFrame.) This contains all the event listeners and handles the "save" and "open" operations. The MapPanel is a grid of characters, each of which determine a block of a given size on the map.

The map may be saved into a text file consisting of a header telling the size of the map etc, followed by a list of coordinates of block types sorted by x.

A typical file is: (level1.txt)

200,50,636
0,0,b
0,1,b
0,2,b
1,17,b
1,18,b
2,1,r
2,13,g
...

You can open saved files. The open function first check for a logical header and then attempts to read the blocks into an Array of type "MapPoint" which is just a container for data of form (int x,int y, char type). If anything goes wrong with any of the points, the map loader jumps ship and returns false. Only if every point makes sense and the number of points is consistent with the header file does the map get loaded on screen and the method returns true.


The final time consuming part was making the program behave like a normal program. For example, if the user has already saved the file and chosen a file location, a new file dialog menu shouldn't pop up when he saves again, it should just save - something I never really thought about. Also, if the user saves then exits, he shouldn't be asked to save again, but if a save is needed, a polite program would ask of he wants to save first. To this end, boolean values for were created to denote whether a filename has been selected yet and whether a save is required.

Other challenges were making the functional part of the program convenient to use. It would be very annoying to have to draw the map by clicking each block individually. To circumvent this, a click-drag feature was implemented by checking whether the user is holding the mouse down. Also, it is essential to clear mistakenly placed blocks and to know what type of block is currently selected. I found that the best way to show this was to have an outline of the current block type hover along with the mouse cursor. Finally, for the "big picture," the user can toggle a mini map on and off by pressing m. The end result looks like this:


This now allows me to continue along with the side-scroller engine and test it out on a few simple maps. The next iteration of this program (if it comes to be) will extend the functionality of the UI by adding features like "undo" and remembering the current file directory so the user doesn't have to constantly navigate there.

The program+source code can be found zipped here, or straight out the gate here.

Thanks to Java Swing, the end results doesn't look too bad and almost resembles a real program that one might find on the internet.

Sunday, October 4, 2009

The Jog Mapper

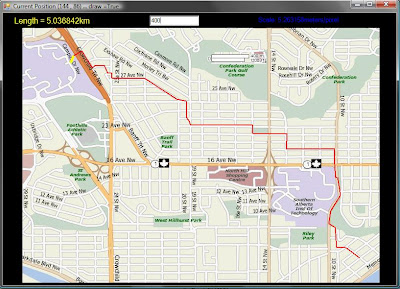
Sometimes, when I've watched to much "The biggest Loser", I decide to go for a run. I put on my shorts and runners, start my watch and go. Roughly 30 minutes later, I stop my watch and keel over. I look at my time and realize that I don't know if it's good or not, because I have no idea just how far I've run. I decided to go on to mapquest to trace out my root, but this was awkward since I don't usually run along roads. I then just grabbed the image of the map and found out how many 'pixels' I ran, and then converted it from there, but that took a long time. Finally, while running today, I thought "why not just make a basic program to do this: You give it a map and tell it the scale and then draw your path, and it'll tell you how far your went?" - I didn't actually say this out loud. I was conserving every precious bit of oxygen I could.

Here's a screenshot of the program in action. The calibration is done at the beginning where you type in the scale and then drag across the scale-bar to define a conversion fact of meters/pixel. Then you click out your path in line-segments and the program keeps track of the total distance.


Right now, the program is very bare-bones. First off, you have to acquire the map image first, put it into bmp format, and make sure the scale is visible. What would be nice would be to dynamically load the map from mapquest. Second, the user interface is usable, but not friendly. However it does what it does well enough. Thirdly, it would be nice to be have segments that aren't lines, but as long as you don't mind a lot of clicking, it's not a problem.

The guts of the program are as follows: The program starts out in calibration mode. You type in the physical reading from the map's scale, and then click the mouse at the start and end of the scale to get the conversion factor of physical length per pixel. then the program is in the main mode. A display on the top left corner gives you the mileage (kilometerage actually.) When you click at your starting point the program is in draw mode, and a line follows the mouse cursor. Click again and the line segment formed is added to the Path() class. Each click thereafter adds a line segment and the distance continuously updates.

As of now it's a quick and dirty program. If I were to make some changes, it would be (in this order:)
  1. Make the program, resettable.
  2. Design the UI properly, including a file dialog box for the map.
  3. Make the window scrollable to allow for bigger maps.
  4. Get the maps real-time off the information super-highway. (I have no idea how to do this)
For now, the code and zipped visual c# project is accessible here!

Monday, July 20, 2009

Capture the Flag II

I've finished the first programming run for "capture the flag." Right now two teams compete eternally and a counter keeps score of who wins more often.

The field itself consists of four regions:
1. The flag zone: The defending team can't go into it's own flag zone, and is a safe haven for an attacking player.
2. The defending zone: The defender and rescuers hang out here. When the enemy attacker is not in this zone, they just track his y-position, when he is, they go after him.
3. The attacking zone: Here, the attacker forms a vector which is the sum of vectors towards the flag, with vectors away from the defender and attacker, with given weights attached to each.
4. The safe zone: In the safe zone, the defender can not capture the attacker, so the attacker no longer tries to avoid anyone and goes straight for the flag. Once he has it, he makes a dash for it to his own zone.

As of now, the rescuer does absolutely nothing - he has the same instructions as the defender, except he isn't allowed to capture. Instead, when an attacker is captured, he has to do a strange sort of dance: first he has to go to the corner of his own zone, then he has to touch his own flag-holder, and then he starts again.

The system often gets into a "deadlock scenario" in which both players eternally get captured, do their dance, and get captured at the exact same place. This problem could be avoided by imposing a time limit on each round and resetting after it expires (the positions of the players are randomized at the start of each round.)

Here's a video of the program in action:


Before doing the really hard part - the genetic algorithm part, one more programming run is needed, to iron out the kinks. This means:
  1. Make the program more modular (i.e. variable number of players for each team)
  2. Make a jail (to give the rescuers something to do)
  3. Clean up the player logic (there's a lot of ad hoc stuff in there right now to make it work)
  4. Add timers etc. and pretty it up a little.
For now, the C# code and zipped Visual Studio C# project is located here!

Wednesday, July 15, 2009

Capture the flag

I'm interested in programming A.I. Not in an academic sense, but just for kicks. The problem is that I'm a pretty mediocre programmer. Still, the best way to learn anything is to just dive in there and sort out all the confusion (while making hundreds of ridiculously stupid mistakes.)

The language I chose to work with is c#. The reason is that I already know Java programming from my undergraduate days, and it seem pretty similar. Also, I'm now using a windows box, so why not use the nice .NET framework - I really just don't want to worry about the details.

My first program will be a game of capture the flag, in which the computer competes against itself. It won't serve much of a purpose, aside from sitting around and playing with itself all day (if this serves as a "purpose" in life, please let me know.)

I'm a "ground-up" kind of guy, so I'll start with a really bare-bones project and then build on it. My dream-goal for the end result is to have a program that makes use of a genetic algorithm and evolves to the ideal player for the job. My idea is that each player will have a geometric profile that determines it's characteristics such as acceleration, drag (air resistance), agility, and stamina. I'd like to see which characteristics emerge given the constraints of their duties.

The first iteration will have two teams, each consisting of a defender, a rescuer, and an attacker. The defender will hang out around the flag, and chase after the enemy attacker, the rescuer will help defend, until the attacker get captured, and the attacker will go for the flag. Each player is represented as a point. At each "tick" of the clock, each player thinks and determines his or her acceleration, and moves. They'll bounce off a wall if they run into it. The behavior will be determined by their "type":
Attacker: acceleration is sum of vectors towards flag and away from defender.
Defender: acceleration is towards where the attacker will be in 'n' steps.
Rescuer: If the attacker is captured, same as attacker but towards attacker instead of flag. Otherwise, same as defender.

I'll try to post the result of each coding session, whenever I have time to work on it.

Source code for version 0 (plus an addition or two), here but not commented and buggy ... more to come.

Version 0 in action: