Saturday, November 13, 2010

Side Scrolling Fun V: Music, Levels, Bosses, and Media Managers

The next iteration of the side-scroller engine is up and running, and is almost starting to resemble an actual game. The first thing I did was find out why the game took so long to load. The answer was simple - I was being stupid: each instance of image and sound in the game was being loaded each time it was needed. In other words, I had roughly 3000 tiles consisting of one of 3 distinct images. When the level was loaded I loaded each image separately from the server, i.e. I downloaded ~3000 image per level, while in fact I needed to download three. To get around this, I wrote a ImageManager (iMan) class. Each time an Image is needed you ask the iMan for it and give it only the filename. The iMan checks its database to see if that file has been loaded yet. If it has, it returns a copy of the image, only if it has never loaded that image does it request it from the server. This lead to a tremendous speed-up in loading time and seems to work fine.

The next fish to fry was sound - both sound effects and soundtracks. I started by making a sound manager (sMan) similar to the image manager. Next I had some struggle with sound formats. Java doesn't care much for wav files. I basically had to tinker with the bit-rate, depth, etc. to get it to play, and I still don't know why some play and some don't. All I can say is that the java native sound engine is good, but finicky. As for sound track, I went for straight up midi which was a lot easier to work with. Currently, all the songs are ripped off from an awesome repository of nes roms that I came accross and I am starting to try to "compose the original score" :)

The next task was to create game states that allowed specific tasks to occur (ex. loading, player just died, player is playing, etc.) This allowed for an intro screen when the game was loading and cut-scenes between levels. This also allowed for animations and sound clips to run when the player dies or beats a level. The paint and run methods are then if-else statements based on the current state. The states are:
  1. Intro
  2. LoadIntro
  3. LoadLevel
  4. Playing
  5. JustDied
  6. Boss
  7. JustPassed
The next improvement was the addition of levelguys, i.e. bosses. In boss mode a life-meter pops up displaying the boss' health as the gameState is set to "Boss". The screen also locks and the music changes. After the boss' energy reaches -1, the gamestate goes to justpassed and some celebratory music (currently from Duper Mario Bros.) plays. In order to mediate the timing of the cut-scenes, there is a variable tickCounter which is set when the game enters a given mode. When in this mode, each tick of the game loop reduces the tick-counter by one so that when it reaches zero, a new game state may be entered.

The boss can be seen here. He's (it's a dude) pretty easy and used for debugging purposes.


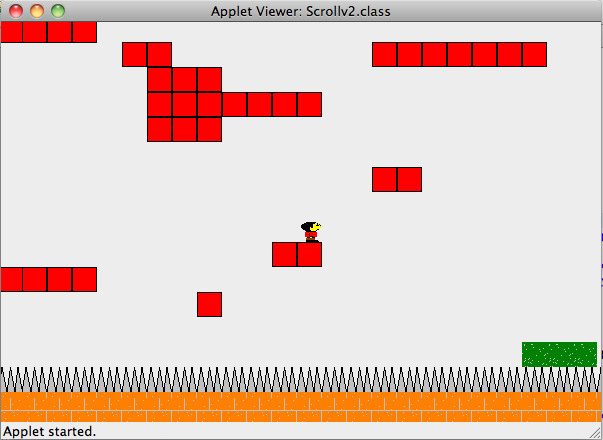
Here's screen shot of the the game in action: Click it to play!


The source code for this version can be found here. The "game" can be "played" here.

Friday, October 1, 2010

Side Scrolling Fun IV: Enemies, Mortality and Backgrounds

For the next small step in the side-scroller engine, I wanted to tidy the look up just a bit, add drone-type enemies, and have it so the player could die. For tidying it up, I first added a parallax background which consists of a layer of sprites and a depth into the screen. The larger the depth, the slower it scrolls, so a depth of 1 would scroll faster (twice as fast) than a layer with a depth of 2m and a depth of infinity would be stationary. This was a cheap attempt at a pseudo 3-D (circa 1982) feel. The background itself could be made in a level editor, or loaded as a random array of background elements upon start-up. For now the only objects are clouds placed at random, at two separate depths.

Another "look and feel" kind of effect was to have a clear-cut beginning and end to the level. You notice in the old Super Mario Bros. series (and most side-scrollers) the screen follows Mario unless he's at the beginning or end (or top or bottom) of the level at which the screen stops moving and Mario move with respect to the screen. To accomplish this, I just checked if the current screen would be more left than the leftmost tile or more right than the rightmost tile. If so, then the screen was fixed at the extreme point, i.e.

double screenX = 0;

if(xCX)

{

screenX = CX;

}

else if(x>levelMaxX-CX)

{

screenX = levelMaxX-CX;

}

else screenX = x;


... and similarly for y. Also, to make things more efficient I only computed collisions, drew tiles, and processed enemy behavior if they were visible. Since each of these elements are sub-classes of and abstract "Square Object" class, or Squob, this is really simple. At each iteration get all squobs within a half screen width distance from the player and update and draw those objects alone. Right now the speed-up in unnoticeable but for larger levels with more advanced processing, this could become significant.

Next step was getting enemies on the screen. This was done by making a generic Enemy class which extends Squob. No opponent in the game is directly from this class, but each individual enemy extends these properties. Then I just created an array of enemies and updated the array on each game iteration. Each enemy has a sprite manager which handles its animation and a function called iterate() which defines its behavior. Right now, the "behavior" is just to walk in a straight line and turn around if its next step will bring it over a ledge or if it bumps into another enemy or a wall. Whether or not a collision occurs is passed to the enemy from the main program.

The two prototype monsters are the "grunt":

and the "peon":
which basically do the same thing now: walk back and forth, and hope to bump into "smiley":
... who is not currently smiling.

In order to conveniently add the array of enemy monsters to the game in just the right place. I modified the level editor to allow for monster placement, as well as player start point. The level file now contains player start coords, enemy positions, and tiles:


clicking on the picture will give you the zipped source code.

To make it so the player could die, I just check for special cases in the collision detection. For example if the player collides with a spike, he dies. If the player collides with an enemy from below or the side, he dies, but if he collides from above, the enemy dies. Here the player dying means that his 'lives' get reduced by one, and he's warped to the beginning of the level. Now, nothing happens if he runs out of lives he just has a negative amount of lives. The philosophical implications are mind boggling!

Here is a screen-shot of the program in action. Click on the pic to try the game. One problem is that the loading time is brutal. At first I thought that it was the server but after writing a simple test program which loads a single image and text file from the server I noticed that this was not the case, as the test program ran instantly. Upon closer inspection I think it's just that I was being stupid. When the level is loaded it loads each tile as an image from a URL which is ridiculous. For next iteration of the program I'll just load each item once (via a LoadManager?) and store these images as global type files.


In the next programming run, the goal is to make a polished, 2 level game that doesn't make any sense. The game will have sounds, cut-scenes, intro, game-over screens, 1-up, nicer graphics, level bosses. In addition I'll try to debug all the little problems like slow loading times. This all needs to happen before the final stage of game design - that is; a story, characters, and lots of levels and variety.

Saturday, September 11, 2010

Side Scrolling Fun III: Sprites & Tiles


With the level editor complete, I added some code to read in a level file, allowing the player to roam free in a bigger world. The next step was to pretty things up a little by drawing each tile from an image (instead of a red, green, or blue square.)
Since the level could be, in principle quite large, it didn't make sense to draw the entire level each "tick," but to at the very least draw only what is visible on the screen at the time. Given that the blocks from the level file are already sorted by x-position, and since the levels are long but not tall, this wasn't too hard. I just searched through the array of "Squobs" until I got to the first one which had an x-component greater than the leftmost screen point minus the block width and marked that as the starting point. From there I kept going through the list until I got to the first brick which had an x-coordinate greater than the rightmost screen-point and marked that as the ending point and drew all of the blocks in between.
The next task was to draw the player as an animated sprite. Normally sprites are a collection of images which animate in sequence to make the appearance of moving. Since you don't necessarily want to make one animation frame per clock cycle, you can incorporate a frame rate by counting up each clock cycle to a certain number before flipping frames. For the purposes of making a character look like he's walking, I counted distance traveled instead of clock cycles. This makes it look a little (but not too much) more natural and keeps the character from walking on the spot when his velocity is little or zero.
In order to get the player to face the right way and to look like he's jumping when he's jumping, I gave the Sprite class a set of states:
  1. s: Standing and facing right
  2. S: Standing and facing left
  3. j: Jumping and facing right
  4. J: Jumping and facing left
  5. r: Running and facing right
  6. R: Running and facing left
... and each is sorted out in the code via a switch(state) statement.

Here is a screenshot of the code in action:


In order to circumvent Java's (admittedly necessary) security measures, all the files are loaded as URLs from the server where they reside. As a result, loading the level takes a really long time. However I couldn't convince Java to read files from a browser so until I find a better way, I'm stuck doing it this way.

The code can be found zipped here or directly here.

You can play the game here (all you need is a little patience.)

Thursday, September 9, 2010

Side Scrolling Fun II: The Level Editor

In the very basic side-scroller engine that I started, I needed obstacles for the character (or circle) to walk on. This was done by manually typing in the coordinates and dimensions of the obstacles directly in the code. This is ridiculous and should be done with a level-editor type program, so I decided to take a stab at one. I decided to try to learn the nice-looking Java Swing layout editor. To simplify things such as file i/o, I made a stand-alone program instead of an Applet. At first, learning Swing was a huge mistake since I spent hours trying to make things work. After a while I learned the basics: the main window is a JFrame, which contains a number of JPanels which can be addressed individually. The frame can have a menu, a toolbar, and a drawing area, among other things.

The main program, which contains a menu, a toolbar and a drawing area (MapPanel which extends JPanel) is MainFrame (extends JFrame.) This contains all the event listeners and handles the "save" and "open" operations. The MapPanel is a grid of characters, each of which determine a block of a given size on the map.

The map may be saved into a text file consisting of a header telling the size of the map etc, followed by a list of coordinates of block types sorted by x.

A typical file is: (level1.txt)

200,50,636
0,0,b
0,1,b
0,2,b
1,17,b
1,18,b
2,1,r
2,13,g
...

You can open saved files. The open function first check for a logical header and then attempts to read the blocks into an Array of type "MapPoint" which is just a container for data of form (int x,int y, char type). If anything goes wrong with any of the points, the map loader jumps ship and returns false. Only if every point makes sense and the number of points is consistent with the header file does the map get loaded on screen and the method returns true.


The final time consuming part was making the program behave like a normal program. For example, if the user has already saved the file and chosen a file location, a new file dialog menu shouldn't pop up when he saves again, it should just save - something I never really thought about. Also, if the user saves then exits, he shouldn't be asked to save again, but if a save is needed, a polite program would ask of he wants to save first. To this end, boolean values for were created to denote whether a filename has been selected yet and whether a save is required.

Other challenges were making the functional part of the program convenient to use. It would be very annoying to have to draw the map by clicking each block individually. To circumvent this, a click-drag feature was implemented by checking whether the user is holding the mouse down. Also, it is essential to clear mistakenly placed blocks and to know what type of block is currently selected. I found that the best way to show this was to have an outline of the current block type hover along with the mouse cursor. Finally, for the "big picture," the user can toggle a mini map on and off by pressing m. The end result looks like this:


This now allows me to continue along with the side-scroller engine and test it out on a few simple maps. The next iteration of this program (if it comes to be) will extend the functionality of the UI by adding features like "undo" and remembering the current file directory so the user doesn't have to constantly navigate there.

The program+source code can be found zipped here, or straight out the gate here.

Thanks to Java Swing, the end results doesn't look too bad and almost resembles a real program that one might find on the internet.

Monday, August 30, 2010

Side Scrolling Fun

I always wanted to make a Mario Bros. style side scroller. I tried once long ago but I had such a hard time dealing with things like; "how does the player know not to fall through bricks but to fall when he's at the end of them" that I just gave up. Today however, I decided that maybe in my old age, I've acquired the wisdom and patience to accomplish such a feat. The feat will be attempted in Java.

I've also been itchin' to do some programming on my new macbook pro, so I downloaded the latest version of eclipse, slid the icon to the application thingy and blasted out a preliminary engine. Now, this engine is very preliminary, but it's a start.

Basically, the player is a circle which falls under gravity and can stand on square objects (Squobs) which he can't pass through. He (it's a dude) experiences drag and will grind to a halt if you let go of the controls. Also, he can jump.


The code is very simple: The whole thing runs on a thread which:
  1. calculates his next position
  2. checks for collisions at this position against a list of squobs
  3. handles collisions and applies drag
over and over again. The squobs are held in an array-based data structure and at every step they are all check. This isn't terrible efficient and will be fixed in version 2. Also the sqoubs are manually added in the code which is ridiculous.

The next step will be a level editor to efficiently construct obstacle courses built of squobs that will be loaded on the fly. After that, graphics. Then ...

For now, here's a screenshot:


The code can be found here (zipped), or here.

You can run the applet here.

Saturday, October 10, 2009

Why Do Planes Get Lift?

When someone asks: why does a plane fly, I'd say: "because the shape of the wings, the plane gets pulled up, it's called the Bernoulli force ..." But is this force really enough to overcome the force of gravity for a Boeing 747? The aerodynamics involved are actually extremely complicated, but you can get a "back of the envelope" figure by considering a wing, as drawn below.


Assume that the air flow is non-turbulent, (basically, this means that two air molecules next to each other at the front of the wing will meet at the back of the wing if one takes the upper path and the other takes the lower path. If this is not the case, air would be accumulating above or below the wing and at the back, you'd get vortex effects - i.e. turbulence.)

Note that the wing is slightly longer on top then on the bottom. The bottom is of length L, and the top is of length L + dL, where dL is small compared to L. To emphasize this, lets say:

d = dL/L ... (1)

Since the flow above the wing has to travel a farther distance than the that of the bottom path in the same amount of time (non-turbulent flow), the air on the top is going faster than the air on the bottom.

Since velocity = distance/time, we have:

velocity on bottom = vb = L/t ... (2)

and on top = vt = (L+d)/t = vb + d/t = vb + L/t*d/L = vb(1+d) ... (3)

where in that last step, I used (1).

Now it's time for Bernoulli's equation: it says that, assuming non-turbulent flow, the pressure P, velocity v, and height h, of a fluid with density ρ at points htop and hbot are related by:

Ptop + 1/2 vtop^2 + ρ g htop = Pbot + 1/2 ρ vbot^2 + ρ g hbot ... (4)

The first thing to note is that htop~ hbot, so the lift due to these terms (buoyancy) can be neglected:

ρ g htop ~= ρ g hbot ... (5)

To be convinced of this, the density of air is around 1 kg/m^3 and a wing is about 0.1m thick. Since g is about 10 m/s^2, the differential pressure is on the order of 1 Pascal. For a 10 m^2 wing, this could lift about 1kg, which is much less than the wing itself would weigh.

Next note that the quantity that we're interested in is Force due to the differential pressure. Since Force = Pressure x Area, this is, for wings of area A:

Flift = (Pbot - Ptop)*A ... (6)

Combining (4) through (6), we get:

Flift = 1/2 ρ (vtop^2 - vbot^2)*A ... (7)

We can now use (2) and (3) to get:

(vtop^2 - vbot^2) = vbot^2 (2d -d^2) ~ 2dvbot^2 ... (8)

In the last step, we used the fact that d << 1bot = v, the velocity of the plane, we get:

Flift =ρ A d v^2 ... (9)

... the force of lift due to the wings.

Let's say that the top path of the wing is 5% longer (d=0.05) and that each wing is 10 m^2. Using ρair = 1 kg/m^3, we get:

Flift = v^2, with Flift in Newtons and v in meters/second. In order for the plane to fly upwards, the force of lift must be greater than the force of gravity Fg = m g.

A typical jet can fly at around 200 to 250 m/s, so the force of lift is then about: 62,500 N (now we see why the ρ g h terms could be ignored.) This can lift a mass of 6,250 kg, but a jet weighs in at a few 100,000 kg, so why does it fly?

First off, this is an oversimplified picture: this would work well for a glider or bird (a bird with 10cm x 40cm = .04 m^2 wings and d = 10% would have to go about 30 m/s to glide if it weighed a pound - any slower and it'd have to flap its wings.) A jet on the other hand, has propulsion which pulls it upward, in addition it gets an upward lift from the normal force of the wind. This is the same force that you feel when you stick your hand out of the window while driving down the highway. For a large jet such as a Boeing 747 this actually contributes to most of the lift force.

The point of this was to do a back of the envelope calculation of the "popular" idea of lift, and show that this simplified picture alone doesn't really explain why a jumbo jet flies way up in the sky. For a more details, the complexity of the problem goes up exponentially and you soon have to resort to numerical simulations. However, a really nice (slightly less simplified) discussion is found here!

Sunday, October 4, 2009

The Jog Mapper

Sometimes, when I've watched to much "The biggest Loser", I decide to go for a run. I put on my shorts and runners, start my watch and go. Roughly 30 minutes later, I stop my watch and keel over. I look at my time and realize that I don't know if it's good or not, because I have no idea just how far I've run. I decided to go on to mapquest to trace out my root, but this was awkward since I don't usually run along roads. I then just grabbed the image of the map and found out how many 'pixels' I ran, and then converted it from there, but that took a long time. Finally, while running today, I thought "why not just make a basic program to do this: You give it a map and tell it the scale and then draw your path, and it'll tell you how far your went?" - I didn't actually say this out loud. I was conserving every precious bit of oxygen I could.

Here's a screenshot of the program in action. The calibration is done at the beginning where you type in the scale and then drag across the scale-bar to define a conversion fact of meters/pixel. Then you click out your path in line-segments and the program keeps track of the total distance.


Right now, the program is very bare-bones. First off, you have to acquire the map image first, put it into bmp format, and make sure the scale is visible. What would be nice would be to dynamically load the map from mapquest. Second, the user interface is usable, but not friendly. However it does what it does well enough. Thirdly, it would be nice to be have segments that aren't lines, but as long as you don't mind a lot of clicking, it's not a problem.

The guts of the program are as follows: The program starts out in calibration mode. You type in the physical reading from the map's scale, and then click the mouse at the start and end of the scale to get the conversion factor of physical length per pixel. then the program is in the main mode. A display on the top left corner gives you the mileage (kilometerage actually.) When you click at your starting point the program is in draw mode, and a line follows the mouse cursor. Click again and the line segment formed is added to the Path() class. Each click thereafter adds a line segment and the distance continuously updates.

As of now it's a quick and dirty program. If I were to make some changes, it would be (in this order:)
  1. Make the program, resettable.
  2. Design the UI properly, including a file dialog box for the map.
  3. Make the window scrollable to allow for bigger maps.
  4. Get the maps real-time off the information super-highway. (I have no idea how to do this)
For now, the code and zipped visual c# project is accessible here!